Showing posts with label cooking. Show all posts

Tuesday, 26 June 2018

Classics: Chicken Noodle Soup (aka The Man Flu Meal aka the Most Expensive Soup I have EVER made!)

Before leaving to go out of town (aka go to the boyfriend "J" while job hunting online and visit my dog Loki) - my oldest kiddo had a cough.  And because he has no idea of basic manners with covering his mouth or coughing into his elbow - he naturally coughed all over me. 
(He has autism and you can read about that in my other blog!))
I am waiting for it to hit me like a ton of bricks. 
So I washed my hands a lot, I showered sometimes twice a day, I ate healthy (as I usually try to) and when I got to J's town - it turned out he is sick too.
I am currently on the sofa wrapped in a blanket after having gone out for a walk with Loki and then promptly filling myself with a bowl of warm soup.

And soup always tastes better the next day doesn't it?!  What is that magical thing that happens overnight in the fridge? The blending of flavours...and of course, soup is good fresh too. 
But the next day = magic.

So - do you want to make a batch of The Man Flu Meal? The "meal" part being you can serve this soup as a meal itself but I also whipped up some basic dinner rolls to go with the soup.
AKA the Most Expensive Soup I have EVER made - well, scroll to the bottom for THAT story...

First thing to note: I own a slow cooker and if I had it here with me - I would have used it.  Tossed everything in and leave it on low for 8 hours or high for 4 hours.
But I didn't...I used a regular pot on the stove.  And you can too.

Second thing to note: you can save your veggie peelings and end bits and put them in a freezer safe ziploc bag and use them for your future veggie soup broth stock!

As usual (aka third thing to note) - there's no official measurements and portions are dependent on your dishware size and starve-o-meter!
If you're running low on the broth part - add more water, a bit more salt and spices and warm it up again! That's what I do!

So let's do it!

What do you need:

  • Chicken - whether it be cheap cuts (I used drumsticks) or a whole chicken - go with your budget, whatever is in your freezer or handy enough for you to carry from the shop!
    • I used 4 drumsticks but I was also working with a small pot!
  • Carrots peeled and chopped - x3 medium
  • Potatoes peeled and cubed - x3 medium
  • Celery chopped - as much as you like it
  • Garlic cloves peeled and chopped - x5-10 depending on size
  • Ginger peeled and chopped in chunks (you know - so nobody goes insane from the spice or maybe they like it that way...) - depends on preference but I put in a 2-inches long chunk roughly chopped in large pieces 
  • Red onion peeled and chopped- x1 medium
  • Whole wheat pasta - any shape!  - see how healthy I am trying to be? I used the spiral kind of pasta.
    • You can use regular pasta, coloured pasta, whatever you want essentially! There are gluten-free options out there but if they're too pricey - skip the noodles and use wild rice, regular rice or brown rice!
  • Spices all to personal preference:
    • The usual suspects: salt and pepper - to taste
      • You can also use whole pepper kernels - I just grind them
    • Dried bay leaves - x4
    • Dried parlsey
    • Dried oregano
    • Dried chives
    • Dried herb mix
    • Dried rosemary
    • aka whatever is in your spice cupboard that would go well in a soup!
  • The magic ingredient: WHITE WINE! - a very hefty splash or two.
    • Yes children, pregnant/breast-feeding mamas or alcohol sensitive people can eat this soup! Once boiled - the alcohol component boils away - so you won't go walking about drunk afterward...assuming you're just putting a hefty splash or two and not a whole bottle and no water for the main broth part! 😉
If you have a slow cooker - toss it all in (except pasta or rice) including water, cover and cook on low for 8 hours.  Add the rice or pasta the last 15 minutes before serving. Discard the bones.

What to do if you don't have a slow cooker:
  1. Fill a large pot with water about 2/3 of the way and put on the stove burner about medium-high heat.
  2. Once the water starts to boil - add in your ginger, garlic, onions and meat.
  3. Add root veggies, spices and wine - continue to boil until meat is cooked and veggies are tender.
  4. Remove bones and if the meat hasn't fallen off on their own - remove pieces of chicken and scrape meat off with a couple of forks and put the meat and bones back into the pot.
  5. Reduce heat and let simmer 20-30 minutes on low stirring on occasion.
  6. 15-minutes before serving - bring to a boil again and add your rice or pasta.
  7. Before serving - remove bones.
  8. Enjoy with a slice of bread and butter, or a dinner roll, a sandwich or a salad!
No I didn't eat 6 dinner rolls alone! Or did I....?
Now, a funny story to go with this soup...the reason why this is the "Most expensive soup I have EVER made" is because I was cooking in J's kitchen - as I usually do when I am here.  His cooking skills are limited and I like variety. 
SO! I cook.

I was making the soup and once he got home from work - I put the soup to boil again to prep the soup for the pasta. The stove hood (fan thingy above the stove) decided to clunk out on me.  I thought it was fine - I had it on maximum because there was a lot of steam from the soup boiling but when J saw it and I had it decreased down to medium circulation - he tried to push it on max and the button got super stuck and it wouldn't work.

In the end - it was determined that there was a short circuit in the wiring because the house is fairly old and it was just crap luck that I touched the fan buttons maybe twice that day and it broke.

After him humming and hawing over it and trying to figure out what's wrong - he comforted me with the fact that he wasn't mad that I "broke it" - it just was coincidence.

We discussed that it would cost an estimate of 500€ to replace and repair the wiring and he said:

"But it was really good soup and dinner rolls...just very expensive soup and dinner rolls..."

After telling a friend this - he said, "Those are Michelin star prices!"
😂

Ciao for now!
Dominique

Sunday, 11 March 2018

Side Dish: Cheesy Garlic Pull-Apart Bread


Who doesn't love garlic bread?  Besides the few that are allergic of course...
And who doesn't love freshly baked bread?  AND CHEESE?! Beside those that have dairy allergies too - that sucks truly...

Anyway - my point is - that I love cheesy garlic pull apart bread and it's wicked easy to make - although mildly time consuming.
And guess what? You can use your bread machine that has been collecting dust since your Aunt Judy dropped it off in fear of making Uncle Bert too heavy with the baked goods from it.

This recipe will be short and sweet.

Here's the recipe I use via Genius Kitchen (which I believe used to be "food.com") to make my Italian bread dough.
Bake according to the recipe and all will be fine.

**If you want it extra garlic-y - and who wouldn't?! Add some garlic powder in the machine too!

Image may contain: dessert, food and indoorNow, here's the recipe part!

What you need:

  • One Italian loaf - freshly baked and cooled
  • Butter
  • Garlic powder
  • Minced fresh garlic (optional)
  • Parsley (fresh or dry) chopped up
  • Shredded/grated cheese (I use a pizza mix from the grocery store)
  • Parchment paper
  • Bread knife (you know - the long zig-zaggy looking one)
What to do:
  1. Pre-heat your oven to 150*C.
  2. Melt about ½ cup of butter in your microwave or on the stove with the garlic powder (and or fresh).
    1. Add your parsley after butter is melted and give it a good stir.  Keep warm so it is still melted.
  3. Cut your loaf of bread in a criss-cross fashion. 
    **Don't cut all the way through the loaf or else you'll be making croutons...
    1. Cut approximately 4 vertical cuts then turn the loaf and cut in the opposite direction 4-5 times more. (Think like a checker board).
    2. The less you cut - the bigger the chunks.  It's up to you how many chunks of bread you want to make and the size of them.
    3. Set your loaf onto the parchment paper lined baking sheet.
  4. Put your shredded cheese inside the cracks you've created - both horizontally and vertically.
    1. YES you will put more cheese on top! Don't fret! The reason why you should stuff the cracks now with cheese is because it's easier and less messy than once you have butter poured in there and you won't burn your fingers this way either with the hot butter.
  5. Pour your garlic butter (watch your fingers!) all over the bread - making sure it's well coated inside each crevice and all over the top.
    Don't be ashamed for how much butter you use!  There shouldn't be a massive pool of it on the paper- but you want to ensure the bread is full of flavour.
  6. You can brush more butter on and around the loaf if you fancy and then top with shredded cheese.
  7. Bake the loaf on the center rack for about 5-10 minutes- until the cheese is melted and your house is smelling so delicious that the vampires won't be coming over anytime soon...
  8. Enjoy!
Image may contain: food
I should've added more cheese.
Be careful as this will be piping hot because the hot melted garlic-y butter and the cheese will be gooey and yummy and so lovely!
And all you have to do is just pull those chunks of cheesy garlicy bread off as you go and enjoy it!!

Serve this up when having a game night with your friends or as a side for a salad (just kidding!) and pasta night!  Also goes well with a nice stew or soup on a chilly day!

It looks fancy with minimal effort.

Add extra garlic butter for dipping -because why the heck not?!

Enjoy...and don't forget to wear your stretchy pants...it's how I roll personally. :)

XO,
Dominique

Thursday, 8 March 2018

Sweet Tooth: Sea Salt Caramel Sauce

I love caramel sauce - I'm even willing to say more than I love chocolate sauce.  There's just something about caramel sauce that brings the salty and sweet together like no other...well - other than Reese's Peanut Butter Cups - but they're hard to find in Finland and crazy expensive anyway!

This recipe I obtained from cooking school and I love it.  So. Much.
It's to the point that I try not to make it unless super special occasions (like Christmas) so I can avoid the temptation.
I guess if I forget how much I love this stuff - I won't be chugging it...

So! What can one use a jar of SS Caramel sauce on?
  • fruit dip (apples, pears, bananas etc.)
  • dip for marshmallows (bump up your s'more game!)
  • drizzle on ice-cream
  • drizzle on desserts that need caramel - like apple pie, baked and stuffed apples, Brie & Pear tart, apple strudel - the list goes on.
  • drizzle on cake for decoration
  • eat it with a spoon without shame
Anyway, I thought that making my own caramel sauce would be tricky but guess what? It isn't.

What you need:
  • 3dl whipping cream 
    • ** It's possible to use milk instead of whipping cream but it may take longer to thicken or not be as thick. I've personally used cream.**
  • 3 dl brown sugar
  • 1 tablespoon of butter
  • pinch of sea salt
  • sauce pan (I use a non-stick one just in case)
  • whisk
  • clean mason jar with a lid for storage
What to do:
  1. Mix everything but sea salt into the sauce pan and bring to a boil (bubbly) until thickened.  
    1. If your butter is cold & hard - put that first.
    2. Make sure you stir regularly so it doesn't burn.
  2. Sprinkle with sea salt and stir a bit more.
  3. Once it's thickened - take the saucer off the burner and pour into your jar carefully.  Allow it to cool before putting the lid on it and store in the fridge.
I can't say how long it'll last because it just doesn't last more than 3 days in my home! I use it for everything...mostly to eat it with a spoon without shame. :P

If it doesn't seem super thick right away - let it cool and it should thicken a bit more.

XO,
Dominique

Saturday, 3 March 2018

Soup: Wonton Soup

I don't make soup very often to be honest.  But due to a recent post of mine on Instagram - a friend/follower asked me if the wontons fell apart when boiling the soup!
Total legit concern and I figured I would tackle it by teaching you via blog post - how to make your own wonton soup!

I'm sticking to basics here because my ex didn't care for seafood - so I kept the recipe simple.  Most wonton recipes call for shrimp and ground pork or chicken but I just stuck with ground pork.  Unless we had a guest coming over that didn't eat pork - then I switched to chicken!

Sorry in advance that my photos are kind of everywhere - one thing that annoys me about the Blogger site is not being able to put pictures exactly where and how I want them to go!

Here we go!

What you need:

  • 400g of ground/minced pork or chicken (I find beef to be too heavy and greasy)
    • Chopped up raw shrimp (optional)
  • 1 package of wonton wrappers - thawed a couple hours prior to making soup
  • green onions chopped
  • ginger root - peeled and chopped into thin slices and some finely chopped for mixing into the meat
    • Thin slices for the soup itself
  • salt and pepper
  • vegetable or chicken bouillon cube (I use those jelly-like blobs personally)
  • Chinese 5 spice
  • Noodles (optional) - udon for example work wonderfully
  • Bok choy (bottom chopped off and stalks/leaves rinsed well and separated)
  • Large pot for boiling water
  • small bowl of cold water
  • toasted sesame oil
  • soya sauce
  • *Sriracha optional
What to do:
  1. Mix meat, shrimp (if using), half the chopped green onions, finely chopped ginger root and spices (except bouillon cube) and a hearty splash of soya sauce and toasted sesame oil.
  2. Fill a large pot with water about half-way and set on medium heat.
    1. Add the bouillon cube/jelly blob, ginger slices and splash of soya sauce and toasted sesame oil.
  3. Set up your station with your mixed meat, your wonton wrappers and bowl of cold water nearby.
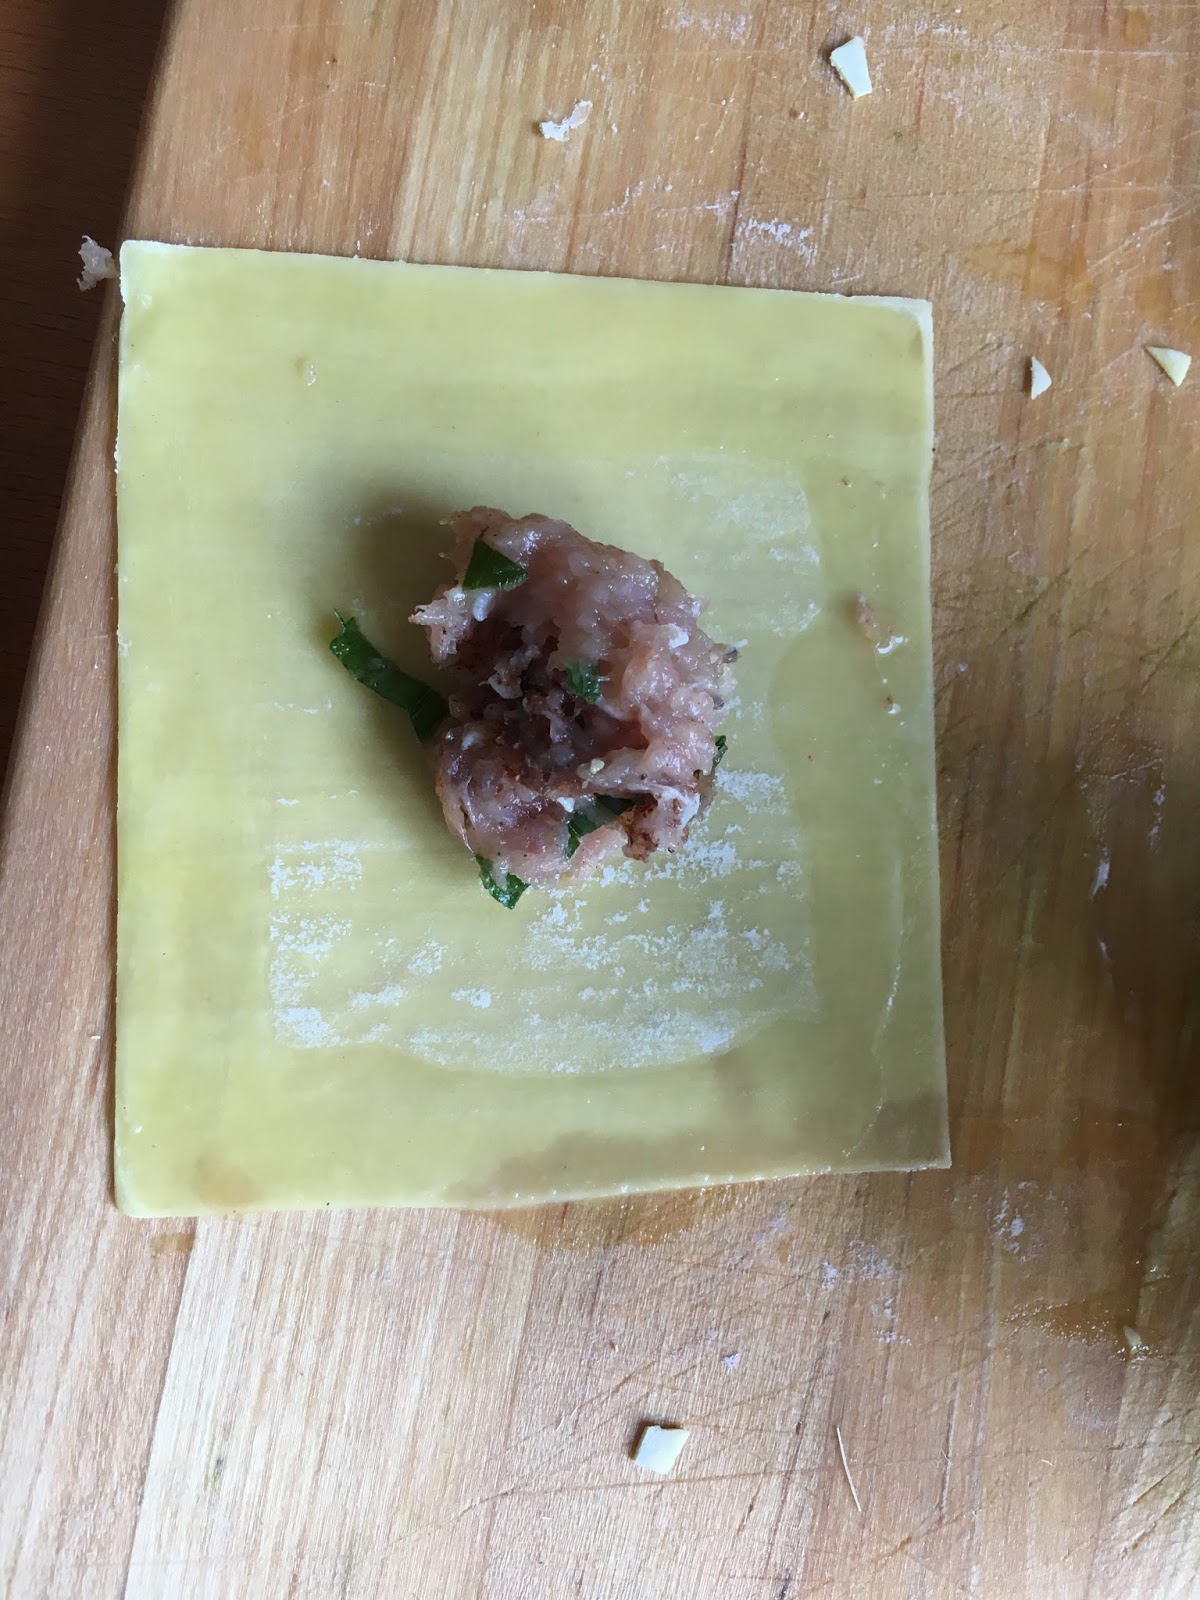
  4. Scoop a bit of meat mixture (about a teaspoon and a half or so?) into the center of the wrapper.  
  5. Dip your finger in the cold water and trace along the 4 sides of the wrapper.
  6. Fold your wrapper from corner to corner (diagonally) so you have a triangle and seal it.
  7. Dip your finger and wet the front of the triangle from the center to the mid point and press down both ends of the triangle and pinch down.
  8. Continue to do this until you're out of meat mixture and wrappers and bring your pot of broth to a boil.
  9. Add your bok choy, noodles and after a couple minutes - the wontons.  Try to plop them in one at a time and not too close together so they won't/shouldn't stick together!
  10. When they float - they are ready!  Carefully scoop them out and serve in a bowl with the noodles and bok choy.  Sprinkle chopped green onions on top if you like.
  11. I also love drizzling sriracha all over or dipping the wontons in it for more POW in the flavour department.

    **You can always add more veggies to this if you want, tofu cubed or whatever floats your boat!  This is super basic and seems to go over quite well with folks when I make these.

    **Leftover wontons (not yet cooked) can be frozen for next time in an air tight container  -although they might stick so try to freeze them with some space in between first.

Step 5

Step 7

Step 8

Step 8

ENJOY!
And there you have it! A typical North American Chinese staple - easily made (with some time) in the comfort of your own home!  Most restaurants serve this with only 5-6 wontons in a bowl - but now that you have the knowledge and power - you can slap as many as you want into your bowl and nobody can judge you.  Or say no. Or stop you from having multiple servings!

XO,
Dominique

Sweet Tooth: Mini Bailey's Chocolate Cheesecakes

Cheesecakes come off as one of those desserts that cost an arm and a leg in a restaurant - but there's really not much to them if you wa...