Showing posts with label Foodgasm. Show all posts

Saturday, 3 March 2018

Soup: Wonton Soup

I don't make soup very often to be honest.  But due to a recent post of mine on Instagram - a friend/follower asked me if the wontons fell apart when boiling the soup!
Total legit concern and I figured I would tackle it by teaching you via blog post - how to make your own wonton soup!

I'm sticking to basics here because my ex didn't care for seafood - so I kept the recipe simple.  Most wonton recipes call for shrimp and ground pork or chicken but I just stuck with ground pork.  Unless we had a guest coming over that didn't eat pork - then I switched to chicken!

Sorry in advance that my photos are kind of everywhere - one thing that annoys me about the Blogger site is not being able to put pictures exactly where and how I want them to go!

Here we go!

What you need:

  • 400g of ground/minced pork or chicken (I find beef to be too heavy and greasy)
    • Chopped up raw shrimp (optional)
  • 1 package of wonton wrappers - thawed a couple hours prior to making soup
  • green onions chopped
  • ginger root - peeled and chopped into thin slices and some finely chopped for mixing into the meat
    • Thin slices for the soup itself
  • salt and pepper
  • vegetable or chicken bouillon cube (I use those jelly-like blobs personally)
  • Chinese 5 spice
  • Noodles (optional) - udon for example work wonderfully
  • Bok choy (bottom chopped off and stalks/leaves rinsed well and separated)
  • Large pot for boiling water
  • small bowl of cold water
  • toasted sesame oil
  • soya sauce
  • *Sriracha optional
What to do:
  1. Mix meat, shrimp (if using), half the chopped green onions, finely chopped ginger root and spices (except bouillon cube) and a hearty splash of soya sauce and toasted sesame oil.
  2. Fill a large pot with water about half-way and set on medium heat.
    1. Add the bouillon cube/jelly blob, ginger slices and splash of soya sauce and toasted sesame oil.
  3. Set up your station with your mixed meat, your wonton wrappers and bowl of cold water nearby.
  4. Scoop a bit of meat mixture (about a teaspoon and a half or so?) into the center of the wrapper.  
  5. Dip your finger in the cold water and trace along the 4 sides of the wrapper.
  6. Fold your wrapper from corner to corner (diagonally) so you have a triangle and seal it.
  7. Dip your finger and wet the front of the triangle from the center to the mid point and press down both ends of the triangle and pinch down.
  8. Continue to do this until you're out of meat mixture and wrappers and bring your pot of broth to a boil.
  9. Add your bok choy, noodles and after a couple minutes - the wontons.  Try to plop them in one at a time and not too close together so they won't/shouldn't stick together!
  10. When they float - they are ready!  Carefully scoop them out and serve in a bowl with the noodles and bok choy.  Sprinkle chopped green onions on top if you like.
  11. I also love drizzling sriracha all over or dipping the wontons in it for more POW in the flavour department.

    **You can always add more veggies to this if you want, tofu cubed or whatever floats your boat!  This is super basic and seems to go over quite well with folks when I make these.

    **Leftover wontons (not yet cooked) can be frozen for next time in an air tight container  -although they might stick so try to freeze them with some space in between first.
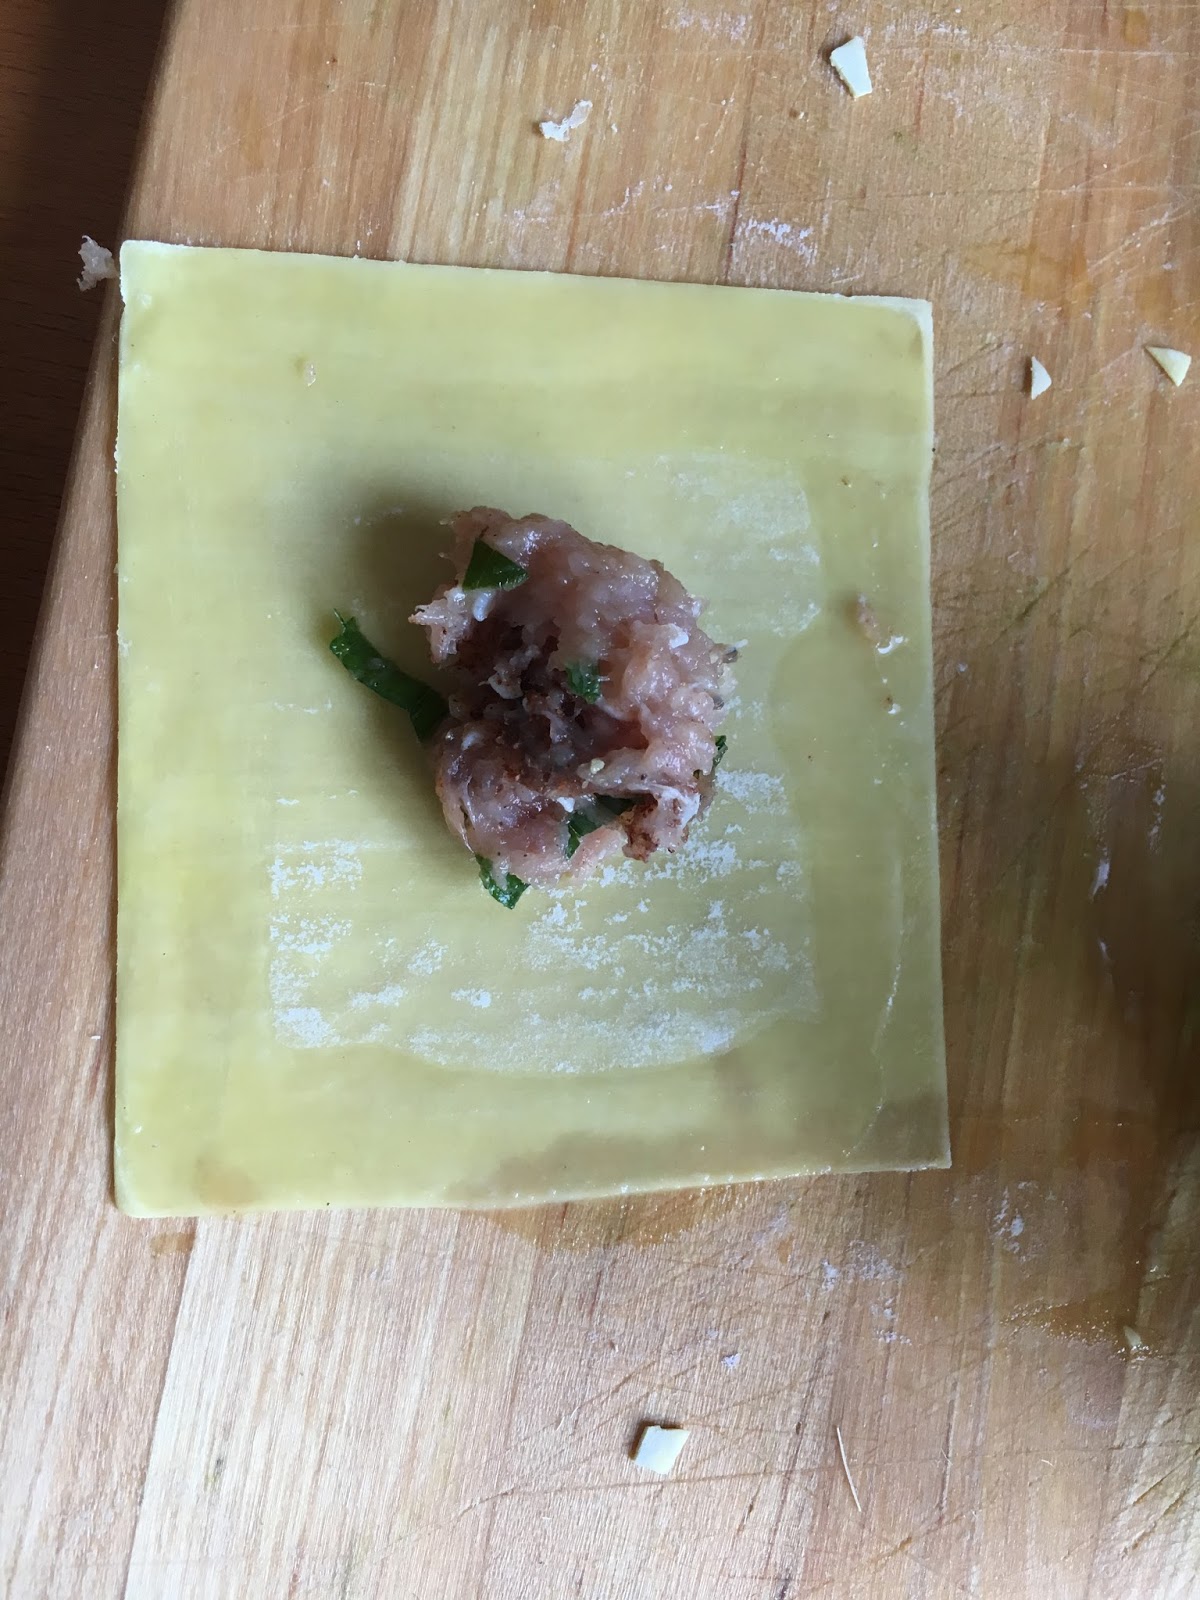
Step 5

Step 7

Step 8

Step 8

ENJOY!
And there you have it! A typical North American Chinese staple - easily made (with some time) in the comfort of your own home!  Most restaurants serve this with only 5-6 wontons in a bowl - but now that you have the knowledge and power - you can slap as many as you want into your bowl and nobody can judge you.  Or say no. Or stop you from having multiple servings!

XO,
Dominique

Friday, 2 March 2018

Breakfast: Omelette

I have never had an omelette until I moved out and quite often, I forget that I love them.

I love the versatility and creativity that can go into an omelette.

Let's face it - an omelette is just a huge circular chunk of beaten eggs that is folded in half and stuffed with whatever is in your fridge.

Quite often I find myself filling it with the basics every time:

  • cheese
  • baby spinach
  • sliced mushrooms
  • prosciutto (not the fancy ass stuff but the cheap stuff that tastes just as fine)
Those are the things I have to have in my fridge all the time.  It is partly to make me feel better about my regularly cheating days and because I actually like the stuff.

Now to get fancier - I may add more things (again - it depends what is in my fridge):
  • bell pepper (any colour but green - eww)
  • bean sprouts
  • chopped red onion (which is actually purple but anyway....)
  • deli turkey slices or ham
  • avocado (or I'll slap that on toast instead of using butter)
  • broccoli
  • tofu cubed
  • cooked bacon (but who ever has leftover cooked bacon?!)
I use 2 large eggs and mix them in a bowl with a fork and add my spices then while I have the frying pan heating up and already sprayed with non-stick cooking spray.
I used to use 3 large eggs but got crazy full and bloated and that just isn't pretty or comfortable!

By spices - I mean:
  • salt & pepper mix (often known as 5 Pepper mix or Montreal Steak Spice)
  • roasted garlic and pepper mix
  • chili flakes
  • Chili explosion (some combination of chilis crushed together)
  • Dry parsley and coriander
  • Spice mixes - whatever I am in the mood for honestly!
Once it's poured into the pan and all spread out evenly - then I go about filling half the omelette with the fillings I have chosen and let it cook a bit more - I might pop a couple slices of whole wheat bread into the toaster and pop open an avocado to spread onto my toast.
Don't get me wrong - I love buttered toast....but I am trying to be good and sound all healthy-like for now.

I carefully fold it over to trap in all the yummy fillings and let it cook a tiny bit more!
Once the toast is out of the toaster and avocado slices on it (or just straight up mashed on top with some honey and chili flakes is nice) - then I slide the omelette onto my plate, take some photos if the lighting is decent and devour it like a pig.
And sometimes I'll splash some soya sauce on top or some spicy sauce..but never ketchup.  That's just weird for me!

Yeah I am one of those people that takes photos of their food and loads it to Snapchat (@fitmama1986)  and Instagram eventually.  I don't HAVE to do it immediately - I'm not that bad...yet.

And obviously I don't eat like this everyday and I rarely bother making them when I have the kids at my place...but every now and again - it's nice to just treat myself!
Especially because I live in a small city in Finland - the concept of going out for breakfast is not very common here.  And Finnish breakfast consists typically of porridge, coffee and some sandwich fixings...maybe some fruit...maybe a bun...nothing terribly exciting.

But anyway - the point of this post is that omelettes are easy and can contain whatever the heck you want them to.  Kinda like fried rice or a stir-fry in the sense that you can fill it with anything and it's going to be awesome.  They're forgiving like that.

XO,
Dominique

Thursday, 1 March 2018

Healthy Snacks: Carrot/Orange/Ginger/Oats Muffins (aka COGO)

The good thing about the word "muffin" is that you're thinking one of two things.
You are thinking, "That sounds healthy!" or you're like me and looking at that adorable pudge hanging over your waistband and thinking "Yeah sounds like muffin top!"

Either way is acceptable and my muffin top is very visible with my pajama pants and I don't give a crap!

Now, I don't know about you but I have picky eaters for children. V-Man used to only eat Chiquita bananas, M-Girl isn't too bad and A-Man is the worst picky eater ever.  He's not just a picky AF eater but he is also the jerk-wad kid that has to make a HUGE flipping deal over how much the food disgusts him and it's yucky and so on - to the point that nobody else wants to eat it either...
If I could consume the amount of fatty carbs as he does and still maintain a 6-pack like he does - I would be living the dream!
Sadly, I do NOT have a 6-pack - never mind a 4-pack or even a 2-pack...rocking the keg style honestly!

So I whipped these up a couple weeks ago with the assumption that A-Man was going to be disgusted and not eat them because Heaven forbid - they have a vegetable in it.

But you know what totally worked?!

I told him that a muffin is just a naked cupcake.  A muffin is the same thing as a cupcake but without the frosting and decorations.
He believed me.  Of course I believe it too and the fact that they're "muffins" means they're healthier and I can totally trick myself into thinking it's socially acceptable to devour three of them in one sitting as opposed to just one and calling it quits...

But anyway - to the muffin making!
*I apologize that the measurements are very "wing it" because that's how I really cook and bake.
** 1 cup is a Moomin coffee mug - so 0,4dl size if you want to be specific

What you need:

  • 2 cups of grated/shredded carrots
  • 2 large eggs
  • 1 cup each of: (make sure you sift the flours!)
    • All-purpose flour
    • oat flour
    • oats
  • 1 tsp baking powder
  • ½ tsp of baking soda
  • ½ cup of melted butter
  • ~1 cup of orange juice
  • Lots of cinnamon
  • Grated fresh ginger (to taste)
  • Lots of honey
  • Less than 1/4 cup of brown sugar
  • Optional: raisins and shredded coconut
    • I added the shredded coconut but didn't have raisins at home.
    • Other option could be nuts
  • Muffin pan
  • Muffin liners (silicone or paper)
  • Mixer (hand mixer or stand one)
    • ************ It is also possible to do this with a silicone spatula or spoon instead!
What to do:
  1. Pre-heat oven to 200*C (400*F) and line your muffin tin with paper or silicone liners.
  2. Mix together the eggs and melted butter.
  3. Add the brown sugar, flours and oats.
  4. Mix in the cinnamon, baking powder and soda and then add the carrots, orange juice and honey.  
  5. Grate some ginger into the mix (and any other optional ingredients you might want to add!) and scoop mixture (it should be goopy and wet) into muffin tin.
  6. Bake for 15-20 minutes - be sure to keep an eye on them so they don't burn and a tooth pick (or chopstick) should come out clean when inserted into the center.
  7. Enjoy responsibly. :D
    1. Some do so with tea, coffee or a glass of milk and some have them buttered too!
    2. Some enjoy after a work-out.
    3. Some have them for breakfast or as part of their packed lunch.
    4. Some just stuff their faces with them and pop their kids mouths with them too for some peace and quiet for 5-minutes.
These were gone within a day! I was floored!  I will try to make them on the weekends and maybe do something bad ass like use zucchini too!

Just remember one thing out of all of this:

"A muffin is just a naked cupcake..."
Enjoy!
XO,
Dominique

Sweet Tooth: Peanut Butter Cookies

I absolutely love peanut butter cookies.  The sweet and salty (and perhaps crunchy!) combo makes me really happy because I actually don't have a huge sweet tooth.

I mean, I'm not the woman in dire need of chocolate whenever "Shark week" occurs every month.  Give me a Big Mac meal and we are good.

But these cookies are fantastic and while I admit - it's not my own recipe (got it from Kraft Peanut Butter jars) - it is a tested and well loved recipe in my household!

What are the perks of this recipe?
  1. They're gluten/wheat-free and dairy-free too!  Unless you stick some chocolate in there because I tend to do that sometimes...I'll drizzle some melted chocolate on top or dunk half into melted chocolate to give it some kick...
  2. It works with crunchy or smooth peanut butter.  These cookies don't judge what kind of peanut butter you bought.
  3. There's not much to them: 1 cup of PB, 1 large egg and 1/2 cup of sugar... = fairly cheap to make, not too much measuring required and hopefully not too much mess!
Finns don't use peanut butter a lot (if at all) - so it's always fun to make these and quickly convert them!  Even one of my colleagues that doesn't have a major sweet tooth loved them!

And yeah, they look absolutely disgusting when you're mixing them - but I promise - they're lovely.  Salty and sweet - just the right combo of amazing in a cookie.

And I forgot to mention that I even made these for Passover for one of my bestie's back home in Canada and her brother in-law couldn't believe that they didn't contain flour or wheat and held together so well! He eventually caved and had one or a few...;)


XO,
Dominique

Sweet Tooth: Rocky Road Ice-Cream

I don't know a single person that does not like ice-cream!  It goes with everything dessert wise and I love it!
I also have to admit that I love the fact that I can make it at home and it's not as sickeningly sweet as the store bought versions or the McDonald's sundae versions too....

I also love the fact that I do NOT need an ice-cream machine for the ice-cream I make because I love the "No Churn Ice-Cream" method.

Pretty much you whip cream until it thickens and there's peaks, add a pinch of salt and a can of condensed milk and your flavours then freeze that sucker in a container for a few hours (or overnight) and poof.  You have ice-cream.
No need for stirring it, or freezing a bowl or container in advance and definitely no need for extra space for your ice-cream machine!

I personally have a kitchen stand mixer - a Kenwood Chef Sense model (the 1100W one) that I got on sale a couple years ago (which I dragged home via sled because I live in Finland and there was a lot of snow and I don't have a car but anyway!) and the great thing about it is that I can get various attachments for it like a meat grinder/sausage maker, juicer, food processor and so on.
But most importantly - I can make some ice-cream!

Of course an electric hand mixer works just as fine - I got rid of mine after my kids dented the beaters and after I invested into this puppy.

So - I made Rocky Road ice-cream today because my friend had been hinting how awfully sugary the one in the store was and I agree.  After I eat store-bought ice-cream I feel a huge sense of guilt and like my teeth are threatening to fall out due to the intensity of the sugar that clung to them.

Here's what you need!

  • 4dl of whipping cream
  • 1 can of condensed milk
  • pinch of salt
  • A hearty teaspoon of vanilla extract - ok vanilla extract is crazy expensive here so I've been using vanilla syrup - like for coffee drinks!  It works for me and my wallet...
  • Chocolate - I used Fazer Milk chocolate about 100g chopped up roughly but use what you like! Chocolate chips could be doable too!
  • 1 sleeve of Grov Marie biscuits (let's say about 14-ish) - the closest thing I could find to a graham cracker here or an Arrowroot cracker - crush them up without shame!
    • I used a jar of pasta sauce to crush them up in a stainless steel bowl...
  • Candied cherries
  • Salty or dry roasted peanuts - couple handfuls should do the trick.  Unless you're allergic (or whoever is going to eat this ice-cream is)- then probably you shouldn't.
  • Mini marshmallows - one bag 
  • Some sort of mixing device - electric hand mixer or stand mixer - whatever works for you!
  • A spatula - I prefer silicone - they're cheap, easy to wash and dishwasher friendly usually!
  • A container that can handle freezing with a lid - I just use those empty candy boxes from the bulk candy section that the grocery store leaves behind for customers to take for free.  But I've seen people use loaf pans or large Rubbermaid-kind of containers too.
  • A freezer with space - or a very cold balcony.
  • 15 minutes or so then a few hours of patience.
What to do!
All my goodies into a bowl.
Aww look at that little peak!
  1. Pour your whipping cream into your mixing bowl and begin to mix your whipping cream until thick and peaks are forming.  
  2. Sprinkle your pinch of salt and pour your can of condensed milk in there too.  (I find having a spatula very handy for scraping out the layer of condensed milk that can't seem to leave the can!)
  3. Mix some more and add your vanilla extract.
  4. Add your chopped chocolate, crushed cookies (aka anger management), nuts, mini marshmallows and mix slowly.
    ** You can simply fold it in with your spatula or just slowly mix it with your mixer.
  5. Pour into your container and pop it in the freezer for a few hours.
Before it went to the freezer...
That is it.  You don't need to check on it or stir it or whatever you're supposed to do with an ice-cream machine.

Few hours later I had to try it. 
It was a bit soft because it hadn't frozen completely but it was still yummy!
Some other flavour ideas that I have done (you'll have to use your imagination because I may not don't have the photos for them on my phone...):
  • Vanilla: Cream + Condensed Milk + Vanilla extract
  • Old Fashioned Vanilla:  Cream + Condensed Milk + Vanilla bean pod split and scraped out
  • Cookie Monster: Cream + Condensed Milk + Vanilla extract + Blue food colouring + crushed Oreos and crushed chocolate chip cookies This was a Pinterest WIN!
  • Vanilla Maple: Cream + Condensed Milk + Vanilla extract + maple syrup (aka some Aunt Jemima stuff) 
    • ** I served this with a home-made salted caramel sauce and a brie and pear tart and it was a real decadent treat! **
  • Mint Chocolate Chip: Cream + Condensed Milk + Peppermint extract + Green food colouring + dark chocolate chips
  • Chocolate Chip Cookie Dough: Cream + Condensed Milk + Vanilla extract + chunks of cookie dough (without eggs) Ben & Jerry's is crazy expensive here so I make my own.
And there you have it!
XO
Dominique

...Under Construction!...

Yep you caught me.  I started a blog after the kids went to bed and I have to get up early in the morning and rush about....and then I am leaving you with this pitiful little blog post saying "Hi - yeah bye".

I'll be back - I promise.  I at least should say a bit about myself right?

Well, I'm a divorced mom of 3 kiddos - V-Man (8), A-Man (6) and M-Girl (4).
If you think that sounds familiar - you're right.  I also write for my other blog (rarely I know!) called "Blogging in My Undies" - which is mostly about my life as a mom and raising a kiddo with non-verbal autism and so on.

But I wanted to get away from all that.  I wanted to write a blog and make a Youtube Channel (in progress also) from my messy-ass kitchen...
I am a chef (or cook - whichever term you prefer) part-time and have a lot of time where I should be cleaning but where is the fun in that?!

Here's what I am hoping to cover (in no particular order of course) in this blog:
  1. Recipes - whether I am testing new ones, trying to make trusted and true basic comfort food better or just simply winging it...I want to share my ups and downs.
  2. Cooking on a budget - I am broke AF and have to get creative at times!
  3. Cooking with limited resources - not just because I am broke AF as mentioned but because I don't live in a country with many common North American ingredients that you can find at your local Walmart/massive grocery store chains.  I live in Finland. (Moi!/Hei!)  
  4. Product testing - I love those product testings and reading reviews online - I also rant and rave about products I love (or hate) regularly to my friends...may as well do it here so I stop repeating myself to them. 
  5. Cookbook reviews - I won't promise that I will buy every book out there but I have quite a few and I should probably use them for actually cooking/baking from...instead of just reading the recipe description and looking at the pictures like a 5-year old.
I'll be honest and never sugar coat anything in here when it comes to reviews (especially during reviews!) - you know, unless I am supposed to sugar coat something like a donut...mmmm donuts...
So follow along and let's see how this goes!

XO,
Dominique

PS Please bear with me as I am tweaking this blog, the layout and so on! :D

Sweet Tooth: Mini Bailey's Chocolate Cheesecakes

Cheesecakes come off as one of those desserts that cost an arm and a leg in a restaurant - but there's really not much to them if you wa...